As social media continues to grow and evolve, it becomes increasingly difficult to ignore the importance of it in regards to your business and branding. Traditional media and communication outlets are being bulldozed by social media and streaming services, so it’s more important than ever to realize where your audience is spending most of their time.
And we’re not just talking about the millennial generation. In recent reports, it was discovered that 81 percent of Americans are using at least one form of social media. With that number in mind, reaching and engaging your audience should be easier than ever…or is it?
The problem is that social platforms are constantly evolving, bringing with them things like character count changes, live stories and even animations for your posts, videos and pictures, respectively—and don’t even get us started on the new Snapchat update. These constant updates and additions can create confusion for both personal and professional users. How are you able to fully utilize social media if you’re unsure how to tap into the potential that each outlet offers?
In this article, we’ll discuss ways you can:
- Understand the purpose of each social platform
- Discover how you can maximize your leads through social media
- Learn how to build your professional social brand
If you’re looking for ways to boost your real estate business, let’s get started by breaking down the five most popular social media sites and how to best use them.
Facebook
With close to 1.9 billion monthly active users, Facebook is the most popular social network worldwide. It also serves as a great tool for both the personal and professional user to connect and engage with their intended audience, whether that’s your second cousin or your potential clients.
How to Use It
If you have a business page on Facebook, and have only posted organically (much like you would post a status update on your personal page) you might not be tapping into the full potential of what Facebook advertising has to offer.
By utilizing Facebook paid ads, you’re able to target specific audiences (potential clients) that are most likely to convert into leads. Let’s deep-dive into what that might look like.
Step 1: Choose Your Objective
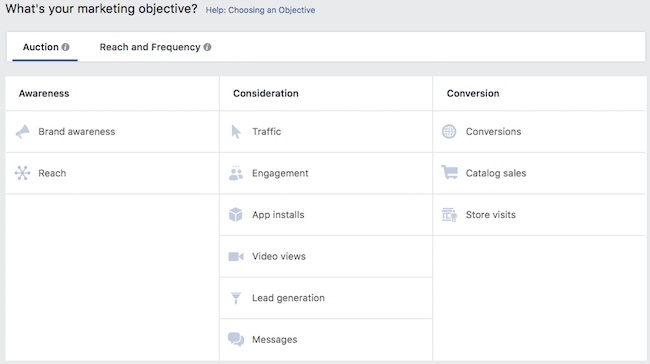
Image: Facebook.com
In order to get the best results from a paid ad, you need to hone in on what it is you’re looking to get out of running the ad. Facebook ad objectives are a way to specify your marketing goals for your campaign or individual ads.
Facebook identifies three types of ad objectives:
- Awareness – Allows your ad to reach potential audiences that might be interested in your brand or business
- Engagement – Allows you to get more follows, likes, video views and clicks on your business or brand page
- Conversion – Encourages your audience to complete an action (like filling out a form) to convert into a lead
When you chose the objective that most lines up with your goals of running the paid ad, you’re able to get better results.
Step 2: Select Your Audience
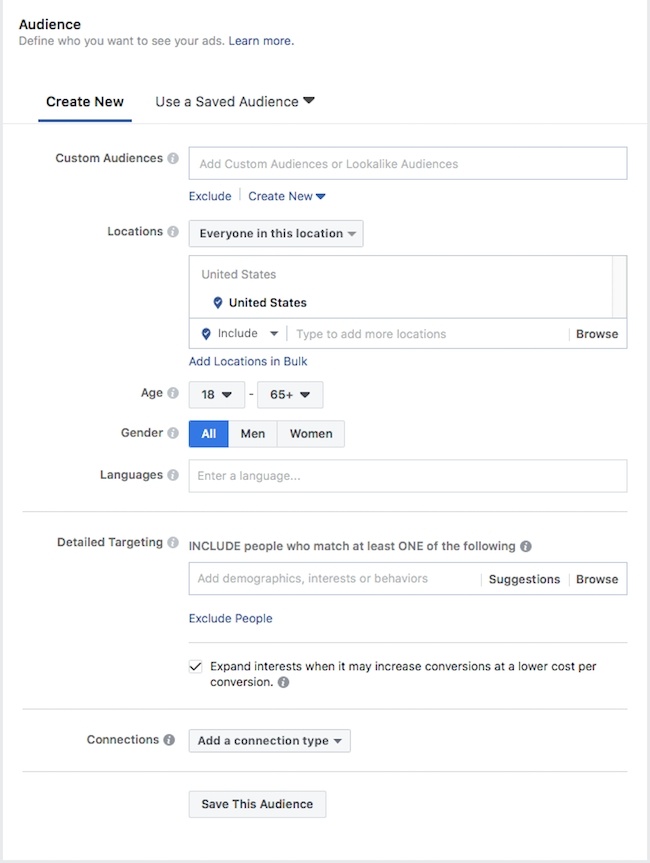
Image: Facebook.com
Once you decide your objective, it’s now time to select the audience that you want your ad to reach. You want to reach those who are most likely to complete the objective you’re looking to get out of the ad, so make sure your ad is in front of the right people. Facebook identifies three types of audiences:
- Core audience – Can be selected manually based on demographics (age, gender, education), location, interests and behaviors
- Custom audience – Helps you reach your existing clients by uploading your contact list to Facebook Ads Manager
- Lookalike audience – Uses your current client information to find those who are similar in interests or behavior
Choosing the right audience is just as important as the right objective. Make sure you’re reaching the maximum amount of people by taking time to determine your audience.
Step 3: Determine Your Placement and Budget
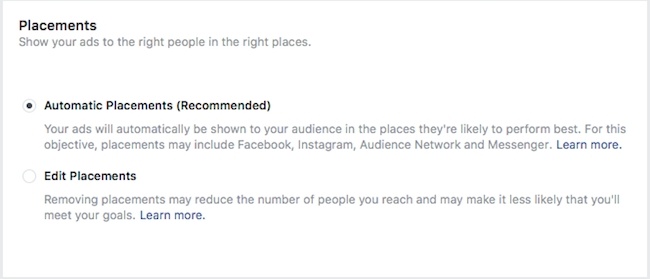
Image: Facebook.com
After you’ve determined your objective and the audience you want to reach, it’s time to decide where you want to run your ad.
You have three options on Facebook Ads Manager: Facebook, Instagram or Messenger. You can run your ad on all three by selecting “Automatic Placements” in Ads Manger, or you can also choose to “Edit Placements” to only run your ad on select platforms.
Additionally in this step, you’ll determine either the lifetime or daily budget and timeframe that you want your ads to run.
Depending on how much you spend or how long you run the ad, this will have a direct impact on the number of people you’ll reach during this time.
Step 4: Adding Photos or Videos to Feature in Your Ad

Image: Facebook.com
The final step of building your ad is adding photos or videos to feature in your ad. This is entirely up to your discretion, based on how you want the ad to look and what you want your audience to take away from the ad.
This can be a picture of a hot new listing, or, if you choose a carousel format, multiple pictures of a listing. It can also be a video tour of a home, where you can show off features in a video format as opposed to showing photos.
Whatever you choose to upload, make sure it corresponds with your objective for the ad and the audience you intend to view the ad, while also working with the timing and duration in which you’re running the ad.
A Word From the Professionals
Using paid ads on Facebook is an extremely effective way to get in front of the right audience. Nick Baldwin, a real estate agent from Keller Williams Realty Group and COO of the Facebook group Lab Coat Agents, a 77,000-member real estate professional group, knows firsthand the power of Facebook ads.
“Running sponsored posts with blogs you’ve written or that are branded to you, community videos featuring local businesses and events around town, and, of course, all the homes you’re selling is where you can showcase the value you offer,” says Baldwin.
Maintaining your real estate business page on Facebook is just as important as advertising, so make sure you’re maintaining a good balance of self-promotion and authentic engagement.
Authentic engagement can be achieved by posting all things local to your business—perhaps an article about an award-winning school in your district or a volunteer organization’s local work with the community. It can even highlight a new restaurant or nightlife venue that’s local to you and your business.
“Facebook is by far the most efficient platform for building trust,” says Baldwin. “Being human and real is extremely important to the consumer now more than ever. People like to work with people they relate to and trust.”
Instagram
At 800 million users and growing, Instagram, owned by Facebook, is a hub for photo, videos and captions. And while it might seem primarily used for displaying pictures of cats or food, it’s becoming more and more of a vital tool for brands and businesses to connect with consumers.
In fact, 60 percent of Instagrammers say they learned about products and services on the Instagram platform, making this another resource to grow your audience and convert your followers into clients.
How to Use It
There are a few different ways your business or brand can utilize a professional Instagram account. Instagram Stories are an interactive video and photo experience within the platform where you can record videos that last for 24 hours. You can also enhance your content with drawings, filters and, more recently, animations.
Unlike Snapchat, Instagram Stories are more stylish and polished, which allows you as a professional to create beautifully curated content to be shared with your audience and followers. Let’s discuss how to create one.
Step 1: Take a Photo or Video
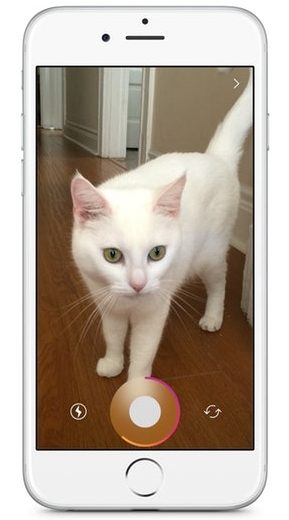
Image: Bustle.com
Your story is a unique way of communicating to your audience through picture or video content. There are a few ways you can share photos/videos on your Instagram Story. With your smartphone, start by hitting the camera icon on the top left of your Instagram screen, or swipe right from anywhere in your feed.
If you want to take a new picture or video, you press the white circle icon, located on the bottom center of your screen to take a new photo, or tap and hold to record a video. If you’d rather use content from your phone’s library, swipe up anywhere on the screen and select which photo or video you’d like to use.
Use this opportunity to share content that will promote your business, like a virtual tour of a new listing or a behind-the-scenes look at the process of buying a home. You could share a success story of a client who recently purchased a new home—the possibilities are endless!
However, make sure you’re staying on-brand with your posts. For example, if you’re a real estate agent licensed in the state of Michigan, you probably wouldn’t show a picture of a home in Florida. Furthermore, you also want to make sure you keep your talking points, images, etc., to your industry and its related subjects.
Step 2: Edit Your Photo or Video

Image: Bustle.com
Instagram has the option to edit your images with drawings, text and stickers. They’ve even added new animations to stories, allowing you to really customize the content you’re putting out to your audience.
To use this feature on your smartphone, tap the pen icon, the text icon (Aa) or the smiley face icon, located in the top right of your screen, to add an effect to your picture or image.
This is the part of the feature where you can really draw the attention of your audience. Make sure you’re staying on-brand with your special effects, and take care to still keep it professional, while adding something fun and engaging.
You can also use this feature to create a call to action (CTA). Let’s say you posted a video of a home that you’re listing. To create urgency behind your post and possibly generate leads, use the text feature to write “Direct message me for details” or “Interested? DM me to schedule a tour.” By creating a timely CTA, you’ll generate an urgency in your posts that can prompt your audience to engage and respond.
Step 3: Share Your Photo or Video to Your Story

Image: Bustle.com
Once you’re happy with the content you’ve created, tap the icon on the bottom left of your screen that says “Your Story” to add the photo or video to your story.
After you post, you’ll be able to find and watch your story in the upper left-hand corner of the Instagram home page. You can view it by tapping your Instagram avatar.
Since your Instagram story will only last for 24 hours, make sure you’re posting at optimal viewing times to get the most reach from your posts. Think about it in terms of when people are most likely to be on their phones. This can be 8:00 a.m., noon or 5:00 p.m. (before work, lunch, and after work, respectively).
A Word From the Professionals
Using Instagram’s creative platform, you’re able to reach your audience in new and innovative ways, increasing your follower base and your leads.
“Instagram Stories are a great way to showcase aspects of a home,” says Baldwin. “You can use overlays for your property photos, create a collage or upload multiple pictures for your followers to swipe and engage with when you have new listings to feature.”
Baldwin suggests learning the right hashtags for what you’re posting to gain further reach, likes, comments and followers.
Baldwin predicts a more efficient future for businesses and posting schedules on Instagram, as they have partnered with a platform called Hootsuite to allow businesses and brands to schedule posts.
“This will allow you to reach more customers in a more efficient, consistent fashion,” Baldwin explains. “For real estate, it could be a big win for those with Instagram business accounts.”
Snapchat
Snapchat’s appeal with the younger generation is evident, as almost a third of adult users are aged 18-24 years. This age range, falling under the category of “millennials,” are experiencing brands and businesses in the form of photo and video content on the Snapchat platform.
Like Instagram, you’re able to interact with a younger audience in a unique way. Millennials make up a huge part of the first-time homebuyer demographic, so let’s look at how to use Snapchat to reach this younger generation.
How to Use It
Even as one of the more successful social platforms for millennials, Snapchat is still a relatively new resource for brands and businesses. There are a variety of features available on the smartphone platform, like Stories and paid ad opportunities, but by far the most beneficial for the real estate realm is the geofilter feature.
A geofilter is an overlay that can be added to pictures and videos on the Snapchat platform, within the parameters of a predetermined time and location. This means you can actually place a geofilter specifically around a house you’re listing. Here’s how you do that.
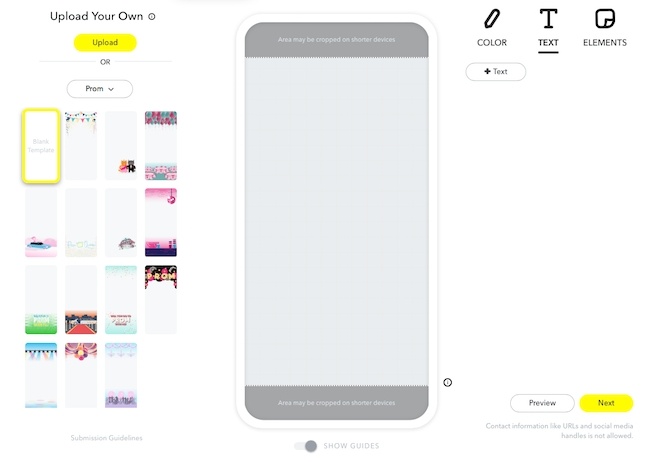
Image: Snapchat.com
Step 1: Design Your Filter
You can design your filter on the Snapchat platform by logging into your account, where you can upload images, logos and any other promotional content you may want on the geofilter. You can also customize:
- The template
- Color palette
- Font
- Emojis
According to Snapchat’s submission guidelines, when you’re creating a business geofilter, you must include a business name in the filter. You can also use branding, business marks, logos or other promotional content related to the business. There are also specific diameters and sizes that you can read about within the guidelines.
You can design your filter using an image editor. Snapchat’s platform accepts designs from Adobe Photoshop, Adobe Illustrator or Canva. From there, it’s really up to you to decide how you want your banner to look; however, if you’re creating a geofilter specifically around a listing, a best practice would be to choose a design that piques the interest of your target demographic.
Step 2: Establish a Location for the Filter
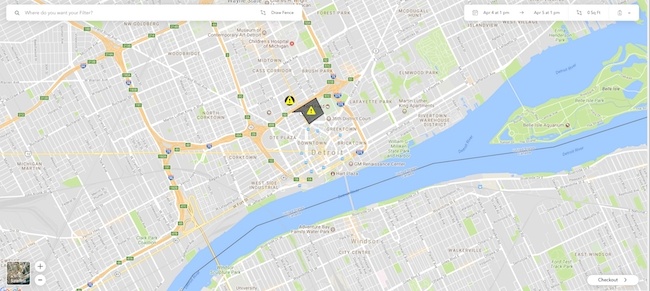
Image: Snapchat.com
After you design your filter, the platform will have you establish a location by inputting the area on a map where you want to feature your filter.
In order to use a business geofilter, your area must be larger than 20,000 square feet. This will allow you to set the filter up around and even outside of the listing. Based on how large your geofilter is, you’ll receive a price based on the size and date range you’ve determined.
After you select the size, Snapchat will have you establish a date and time range for how long you’ll want your filter to be available. You can choose an hour or multiple days to run your filter, but be aware that this will impact the price of the filter.
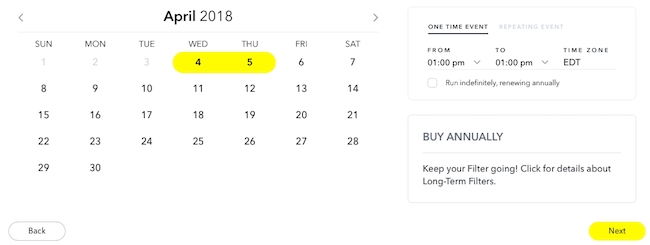
Image: Snapchat.com
Depending on your budget and how long you want to promote a listing, make sure you’re capitalizing on the full potential of your filter by creating a sign outside of your listing that announces the availability of the filter. Not only is this another way of promoting the listing; potential buyers can be intrigued by the presence of a filter on a listing and will have the opportunity to engage with your brand.
Step 3: Promote Your Filter
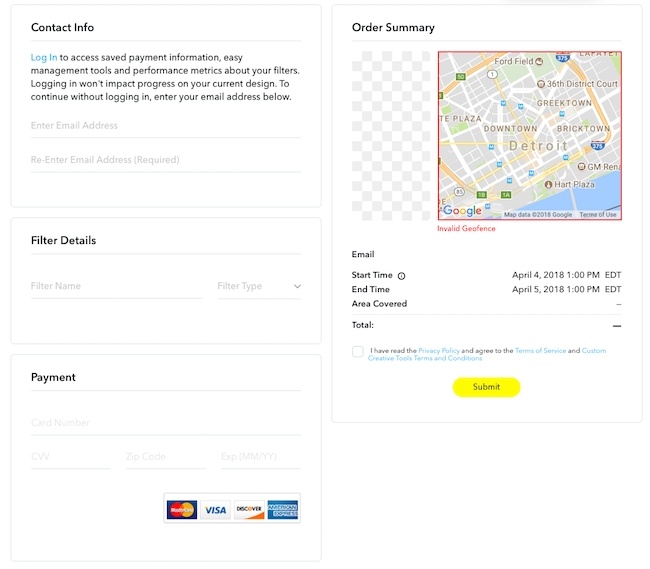
Image: Snapchat.com
Since the filter will only be available within a specific area surrounding the listing, or if you have a bigger budget, or the entire neighborhood, you’ll want to make sure you’re getting the most reach and awareness of your filter by promoting it on your other social platforms.
Since millennials are using multiple platforms, make sure you’re creating a buzz around the filter by posting about it on your business Facebook and Instagram pages. Get your followers excited about the filter by encouraging them to post pictures on their Snapchat featuring your filter.
You’ll be able to determine the success and engagement with your filter on your personal Snapchat dashboard (similar to Facebook Ads Manager).
A Word From the Professionals
Using a Snapchat geofilter is a great way to transform your open houses. Not only will you get engagement from the potential buyers who are touring the house and using the filter; you’ll be able to reach more prospective clients through the friends of the user interacting with your filters.
If you have the budget for a larger filter location, expand your filter to include local restaurants, retail areas or businesses to catch the eye of Snapchat users in those environments. This will allow you to spread the word to more people about your listing, leading to potential leads or referrals.
If you really want to seal the deal, the day your filter goes live, use it to take videos and pictures of the listing to further promote the open house or tours. This will give potential buyers an inside look at what they can expect during the open house and may pique their interest to attend.
Twitter
With an average of 330 million monthly active users, Twitter is a social networking and “micro-blogging” service that enables users to post short 280-character messages, upload photos or short videos, and interact with friends, celebrities, brands and businesses.
Both personal and professional brands are utilizing the platform to share engaging content in a more conversational matter than most platforms. Learn how to create your Twitter content strategy below.
How to Use It
Twitter can be a valuable resource for real estate agents to engage with both their client base and influencer base by coming up with a content strategy for the tweets, photos and video content. When people log on to Twitter, they’re looking for a way to experience new businesses and people.
By curating compelling content for your page, you’re able to attract potential clients to follow your brand or business with the intention of converting them into a lead for your business. Twitter breaks down creating content strategy in five steps.
Step 1: Keep Your Tweets Short

Image: Twitter.com
Regardless of the fact that Twitter recently lengthened the tweet character count from 140 to 280, it’s still best practice to keep your tweets short, sweet and to the point.
Let’s say you’re sharing an article from your professional blog. You don’t need to share every major point in the article within your tweet. Keep it short by saying something to nature of “New to buying a home? Here’s everything you need to know:” and then include a link to the post at the end.
You can even use free services like Bitly.com to shorten the length of your URL.
Step 2: Add Visuals
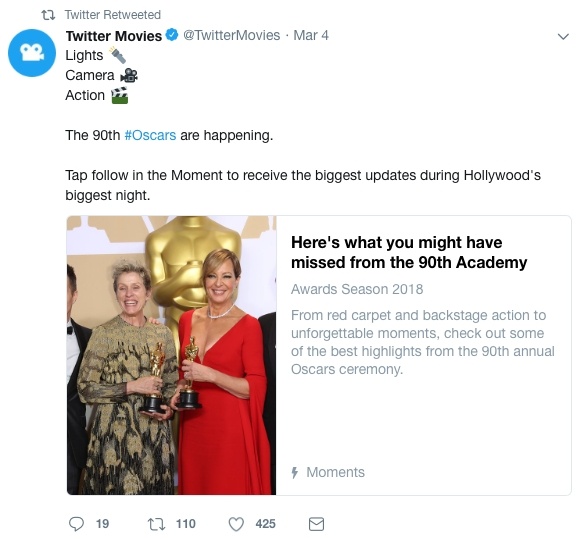
Image: Twitter.com
You know the saying “A picture is worth a thousand words,” and we can see from platforms like Facebook and Instagram that this mantra still holds true.
Using bold images, video or GIFs in your tweets is one way to add a unique, engaging touch that will lead to higher engagement rates. Twitter highly recommends adding visual component to your tweets, as Twitter audiences are three times more likely to engage with Tweets that contain videos and photos.
You can attach up to four photos or one video to a single tweet. This is a great way to showcase a new listing, promote future listings, and engage with potential clients to schedule appointments and tours of the homes you’ve listed by posting pictures or videos of virtual home tours.
Step 3: Incorporate Hashtags

Image: Twitter.com
Hashtags are words or phrases combined in a single, conjoined phrase following the pound sign (#) that allow you to tap into relevant conversations on the Twitter platform. The words in the hashtag function as keywords, linking to each other to make a cohesive conversation experience among various influences and brands. You can click on a hashtag and see everything that has been tagged with that particular hashtag.
By using one or more hashtags in your tweets, you’re able to join this conversation, adding your own relevant content to the discussion and attempting to make connections and gain followers.
For real estate agents, use relevant hashtags that apply to your industry, such as #FirstTimeHomeBuyer or #NewListing to promote your corresponding tweets.
Step 4: Run a Poll
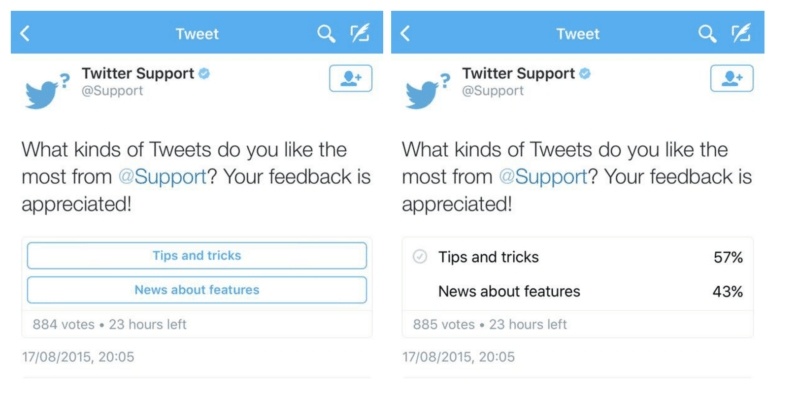
Image: Twitter.com
Another way to create engaging content with your followers is by posting polls that pose a question that your followers are prompted to answer.
The poll feature allows you to ask a question and provide four options for your followers to choose from. This is a great way to gauge who your followers are and the content they care about.
Try using the poll feature to enhance the content you’re posting to your Twitter timeline. You can even ask your followers a question about your business specifically. For example, ask your followers what kind of content they want to see on your website, and give options like “new listings,” “virtual home tours” or even “client features.”
Based on how the majority of your followers answer, you’re now better equipped to put out content that they’re more interested in, and therefore more likely to engage with.
Step 5: Respond to the Haters (or Motivators!)
Perhaps the most important aspect of engaging with your followers on Twitter is making sure you’re creating a positive customer service experience. Since Twitter users mainly use the platform to interact with their favorite brands and businesses, make sure you’re replying to any direct tweets to your business.
For example, whether the tweet is positive or negative, when a user mentions you in a post by using your username in their tweet, make sure you reply in a timely manner to show your other followers you can about your clients—especially since all tweets are public.
If you find that you’re unable to handle your response within the 280 character count, leave a brief, “Check your DMs” and then leave your reply in the user’s private direct messages (DMs).
A Word From the Professionals
Twitter is a great resource for sharing your custom content, interacting with your current follow base and building a new one. Make sure that before you start sending out tweets left and right, you take time to establish your personal content strategy to get the best results for your business.
“We use twitter strictly for content promotion and blogger outreach,” says Matt Bigach, co-founder of Nexus Homebuyers, a residential company in Knoxville, Tenn.
By sharing engaging content with your followers and gauging their experience with your content, you’re better able to create more engagement and potential leads from your posts.
“A majority of our social networks serve the purpose of content distribution,” says Bigach. “We write a lot of content for our website, including guides, blog posts, infographics and testimonials from past clients. We find that when we give these guides away for free on social media, our audience grows organically and people are genuinely interested in your content.”
LinkedIn
Contrary to the previous social platforms that allow you to interact and engage with clients and generate leads for your real estate business, LinkedIn is all about building rapport with your like-minded influencers and real estate professionals.
With nearly 500 million users, LinkedIn is where you can establish and build your personal and professional brand—how you present yourself to peers and potential clients. It’s a crucial and oftentimes ignored concept in building your business, which is why we’ll discuss how to build your network below.
How to Use It
Think of LinkedIn as an online version of your personal resume. It’s a place where you can market yourself, your brand or business to fellow colleagues or potential clients. You can post content that you’ve created or mention recent achievements or certifications to boost your credibility.
When you’re working on boosting your LinkedIn profile, there are a few ways you can build rapport while still maintain a personal, approachable presence online. Let’s discuss how.
Step 1: Establish Your Brand
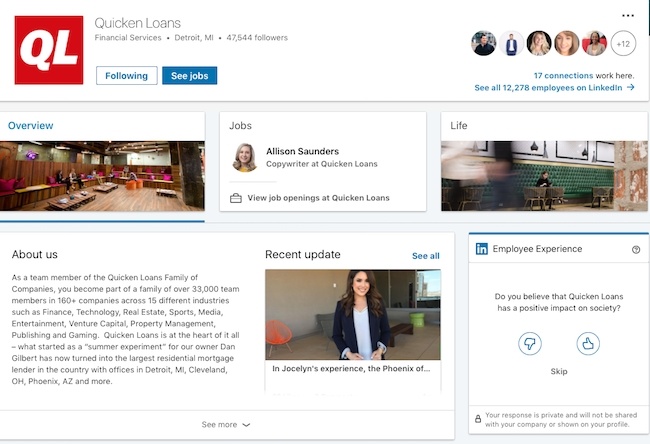
Image: LinkedIn
Your brand should reflect your profession; therefore, your profile, content and interactions should all reflect this fact about you, creating a cohesive experience for your connections and clients.
Start by posting a professional profile picture, like a headshot, of yourself so that your connections can identify a face to the name of the company or brand. This is especially important for real estate professionals during face-to-face interactions with clients during home showings or open houses.
Along with a profile picture, your summary on LinkedIn should be a brief description and include facts about yourself:
- Who you are
- Where you work
- What you do
Don’t hesitate to use the keywords of your industry in order to rank higher in search and become easier for your clients to find.
Step 2: Post Relevant Content
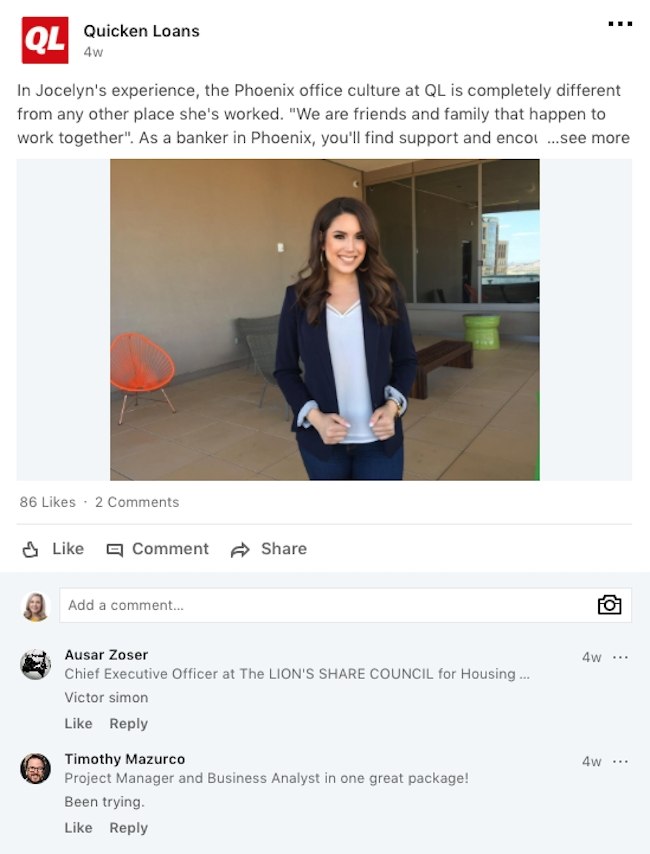
Image: LinkedIn
Whether you’re posting your own original content or sharing relevant content from influencers in your industry, regularly posting content to your LinkedIn will show your followers that you’re an active member of your industry.
It also demonstrates that you stay relevant to current topics in your field of work, whether that’s changes to technology or even mortgage rates that will affect the marketplace.
Step 3: Show Off Your Skills

Image: LinkedIn
It might be awkward to brag about yourself, but when you’re boosting your LinkedIn profile, make sure you list out your special skillsets and accomplishments to become a more appealing choice to your potential clients.
You can build a report by asking for recommendations from previous clients or professionals you’ve worked with in the past.
A Word From the Professionals
Building a strong LinkedIn profile is important for building a solid personal and professional brand. By providing information about yourself and posting relevant content for your followers, you’re creating a positive reflection of who you are as a professional. Clients are more likely to connect with you when they know who you are and what you can do.
“People do business with people they like and people they can relate to,” explains Kevin Vandenboss, broker/owner of Vandenboss Commercial. “On LinkedIn, I post a variety of content—sometimes relevant news articles, sometimes sales, business or real estate advice, and other times I’ll post opinion pieces.”
Not only will you reach potential clients, you’ll also build rapport with similar professionals in your industry, engaging in relevant conversations and building a network of connections.
“LinkedIn is fantastic for networking with professionals who are hungry to connect with thought leaders,” says Tabitha Jean Naylor, owner of TabithaNaylor.com. “I find that the content on LinkedIn is more focused and targeted to a group of people who are experts in their fields and appreciate well-researched, informative content.”
Master Your Social Media Today
No matter if your market is first-time home-buying millennials or retirees looking for vacation homes, learning how to master social media means meeting people where they spend the most time: their phones, tablets and computers.
It’s more important than ever to keep up with the changing tide of technology, and the best way to get started is to create accounts (if you don’t already have them) and immerse yourself with all the features and advertising tools that the five most popular platforms have to offer.
While traditional media outlets might never completely go away, social media is how you’ll connect with your future potential clients. Using our tips will not only help you better understand the five platforms; they can help you turn your followers into clients and clients into leads to boost your real estate business.
This appeared first on ZING! by Quicken Loans. For more information, please visit realestate.quickenloans.com/.
For the latest real estate news and trends, bookmark RISMedia.com.


